In This article, I will explain How Do I Add Network To Metamask? To add network to Metamask, what should you do? MetaMask is more than simply a cryptocurrency wallet. It is a tool that enables you to manage numerous cryptocurrency wallets.
Alternatively, you can communicate with many dApps (decentralized applications) via MetaMask. Once you begin using it, you can unlock additional wallets that you can use with a variety of the ecosystem’s dApps.
How Do I Add Network To Metamask?
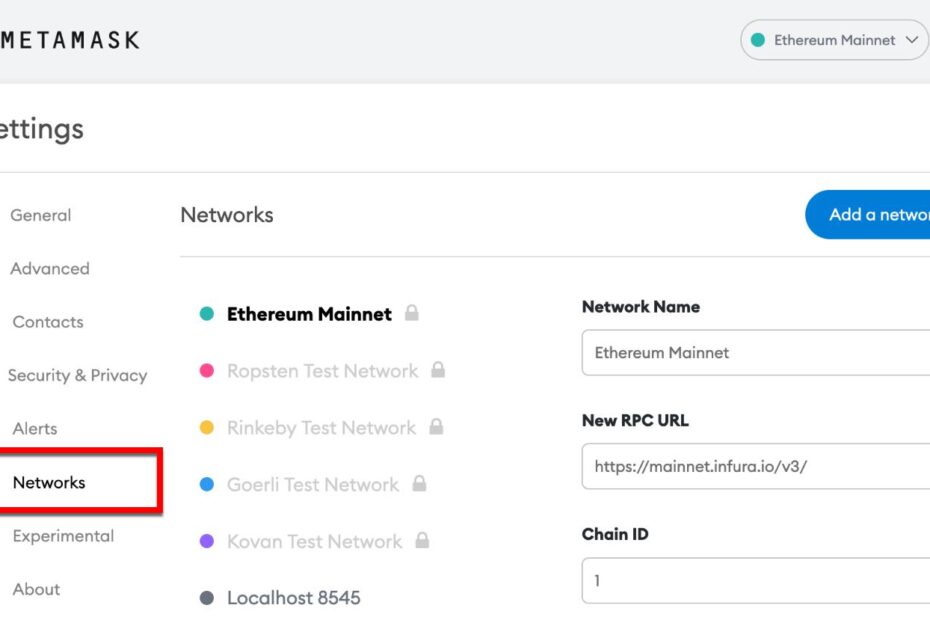
A user-defined Ethereum network that has been added to the list of MetaMask networks is called a custom MetaMask network.
Users can link with the Ethereum blockchain and access dApps online using the browser extension MetaMask.
Users can choose which Ethereum network they want to connect to using a customizable network list.

Any Ethereum network that is not already listed in the normal MetaMask network list can be a custom MetaMask network, including private Ethereum networks, regional development networks, open testnets like Sepolia and Goerli, and other open Ethereum networks.
To send transactions, receive data from the blockchain, and interact with smart contracts, MetaMask must be able to communicate with the Ethereum node given in the RPC URL when a user connects to a custom MetaMask network.
How To Add A Network To Metamask Automatically?
- Launch a new tab and go to the ChainList website.
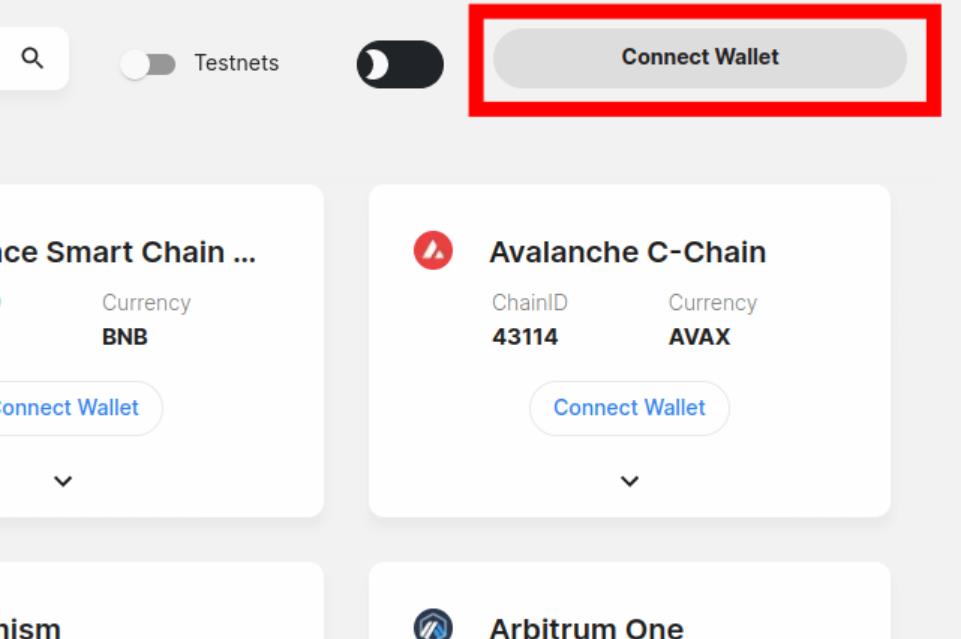
- Click [Connect wallet] in step two.
- On the window for Metamask, choose an account.
- Accept the connection.
- Do a network search to find the one you wish to add to your wallet.
- Click [Add network] six times.
- On the Metmask window, click [Approve].
- To connect to the network, click [Switch Network].
How To Add Any Network To Metamask Automatically Using Chainlist?
Any popular EVM-compatible network can be added automatically to your Metamask wallet using the ChainList website, saving you the trouble of manually adding it using the network’s RPC information.
Open the ChainList.org website in your browser and link your Metamask wallet to the service to add a network to Metamask automatically.
Use the search box on the ChainList homepage to look for the network you wish to add to your wallet after connecting your wallet to the platform.
To add the network to Metamask, click [Add wallet] under your chosen network and confirm the action on your wallet. Here is a step-by-step tutorial (including screenshots) on using ChainList to add a network to Metamask automatically:
- Connect your Metamask wallet to the ChainList website after it has opened. To connect your wallet to the platform, open the ChainList website in a new tab on your web browser and click [Connect wallet] on the homepage.
- Step two is to accept the connection. You should now see a new Metamask window listing your wallet’s accounts. Click [Next] after choosing the account you wish to add to the network.
Select your Metamask accounts by clicking [Select All] before moving to the following page. In general, we advise against doing this. After that, click [Connect] to allow ChainList to connect to your Metamask wallet.
- Click [Add Network] after searching for the network you want to add to your Metamask wallet. Return to the ChainList website and type the name of the network you wish to add in the search box. Then, as shown in the screenshot below, click the [Add network] button under the appropriate selection.
- Confirm the Metamask window action. You should see a new Metamask window after clicking the button asking you to confirm the activity on your wallet. To add the network to your Metamask wallet, press [Approve].
- Switch networks in step five. To allow ChainList to switch Metamask networks from the selected network on your wallet to the network you just added, click [Switch network] at the end.
With this, you have successfully used ChainList to add a network to your Metamask wallet automatically.
For newcomers who become perplexed when attempting to add a network using the network’s RPC details manually, it is better to automatically add a network to your Metamask wallet with a button.
Any network you select from ChainList will be automatically added to your wallet, along with the finest RPC information available for that network.
Open the in-app browser in the Metamask app and go to the ChainList website if you want to automatically add a network to your wallet on the Metamask app using ChainList.
To add a network to your wallet, connect your wallet to the website, accept the connection, look for the network you want to add, click [Add network], and then accept the network addition request.
Conclusion
Without messing with the RPC intricacies of the network you wish to add, we provide a simpler way to add any network to your Metamask wallet. This is the best approach when attempting to add a network to your Metamask wallet(s), which we advise new Metamask users to do.
Open the ChainList website, link your wallet to the service, and then authorize the connection on Metamask to add a network to the platform automatically.
The network can then be added to your wallet by choosing Add To Metamask after you’ve searched for it. And with that, this guide comes to an end. This guide should have shown you How Do I Add Network To Metamask?
Frequently Asked Questions
Which network is MetaMask?
By default, the MetaMask wallet connects to the Ethereum network, but you can quickly connect it to other blockchains to access other DApps. We’ll walk you through the procedure later in this article.
How do I add an apt network to MetaMask?
Due to the blockchain’s incompatibility with the Ethereum Virtual Machine (EVM) programming language solidity, Aptos cannot be added to a MetaMask wallet. Users must install the Petra Aptos Wallet to communicate with DeFi and other network applications.
A multifaceted professional, Muhammad Daim seamlessly blends his expertise as an accountant at a local agency with his prowess in digital marketing. With a keen eye for financial details and a modern approach to online strategies, Daim offers invaluable financial advice rooted in years of experience. His unique combination of skills positions him at the intersection of traditional finance and the evolving digital landscape, making him a sought-after expert in both domains. Whether it’s navigating the intricacies of financial statements or crafting impactful digital marketing campaigns, Daim’s holistic approach ensures that his clients receive comprehensive solutions tailored to their needs.
Related posts:
 Can H4 Apply Credit Card? (Answered)
 Are Credit Card Skins Legal? All You Need To Know
 How do I put a new credit card on my Uber account? Quick Answer
 My Chime Direct Deposit Is Late [All You Need To Know]
 Can You Transfer Cash App to Chime? Quick Answer
 Does Grubhub Accept Visa Debit Cards? Quick Answer
 Does Peacock Accept Debit Cards? Quick Answer
 Can I Rent A Car With A Chime Debit Card? [Learn The Facts]