If you’re a Saitama token holder, you’ve probably heard about the migration from Saitama V1 to V2. This migration is crucial for taking advantage of new features and ensuring your tokens are secure. In this article, we’ll guide you through the steps on How To Migrate Saitama V1 To V2 On Coinbase Wallet.
Key Takeaways
- Understanding Saitama V1 and V2: Know the difference and why migration is essential.
- Migration Steps A step-by-step guide on how to migrate from Saitama V1 to V2 on Coinbase Wallet.
- FAQs: Answers to the most commonly asked questions about the migration process.
- Safety Measures: Tips to ensure a secure migration.
- Additional Resources: Where to find more information and help.
How To Migrate Saitama V1 To V2 On Coinbase Wallet?
Migrating from Saitama V1 to V2 is an automatic process for every V1 holder. The token’s team will take a snapshot of every old Saitama token holder and airdrop an equal value of the new Saitama V2. Therefore, V1 holders do not have to do or pay anything for migration.
Steps For Migration
- Set up Coinbase Wallet: If you’re an old Saitama holder, you need to set up your wallets first.
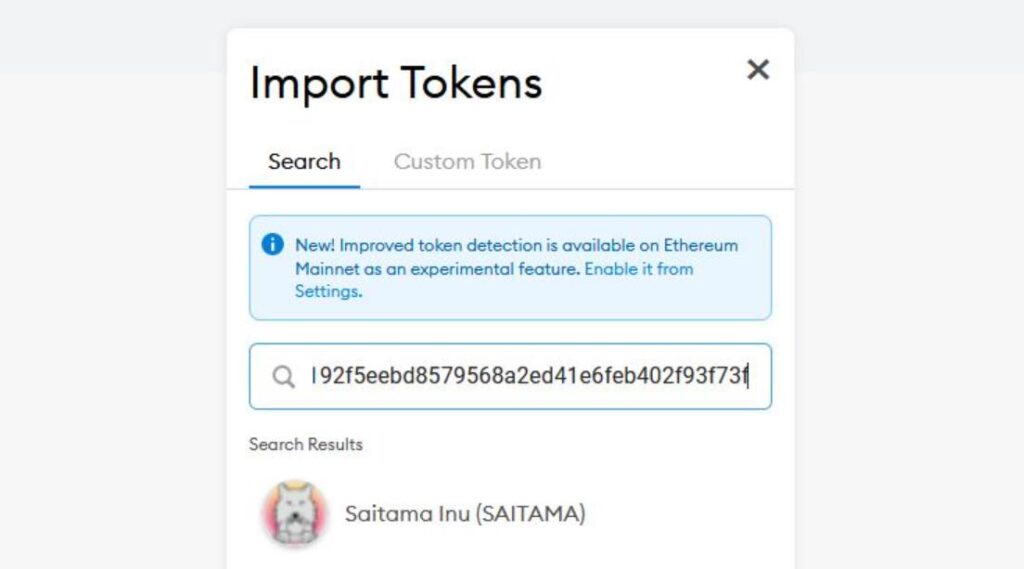
- Copy the New Saitama V2 Contract Address: After gaining access to your wallet, you need Saitama V2’s contract address to add the token to your wallet.
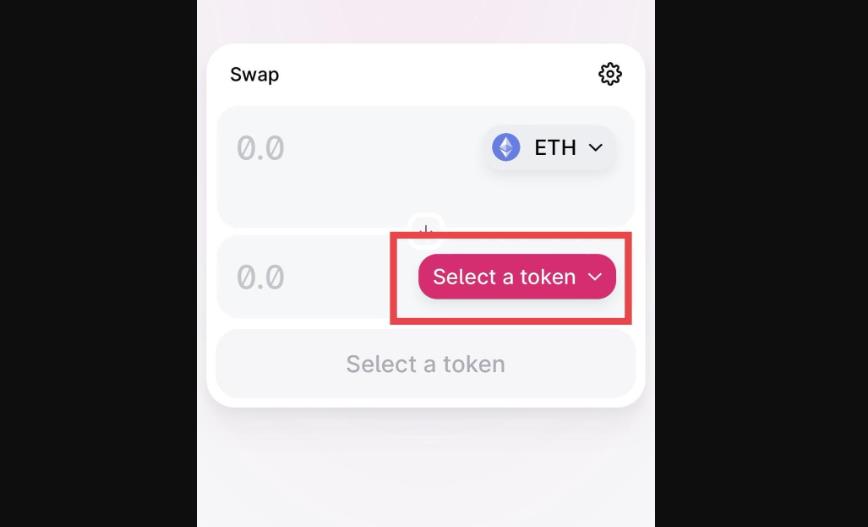
- Import Saitama V2 Token in Your Wallet: Open your Coinbase wallet and tap the SETTINGS icon to add a new token.
Understanding Saitama V1 And V2
Before migrating, it’s essential to understand why Saitama is moving from V1 to V2. The new version brings in improved security features, better scalability, and new functionalities.
Why Migrate?
- Security: Enhanced smart contract features for better security.
- Scalability: V2 is designed to scale as the community grows.
- New Features: Additional functionalities like staking are introduced.
Steps To Add Saitama V2 Tokens To Coinbase Wallet
Adding Saitama V2 tokens to your Coinbase Wallet involves a few simple steps. First, open your Coinbase Wallet and navigate to the “Tokens” section. Click on “Add Custom Token” and enter the contract address for Saitama V2. Make sure to double-check this address for accuracy. Finally, confirm the addition, and your Saitama V2 tokens should now be visible in your wallet.

Steps To Migrate From Saitama V1 To V2 And Add Your Tokens To Coinbase
Migration from Saitama V1 to V2 is usually automated. The Saitama team will take a snapshot of all V1 holders and airdrop an equal amount of V2 tokens. To add these to your Coinbase Wallet, you’ll need to follow the steps mentioned in the previous section.
What Is SAITAMA V2 Migration?
SAITAMA V2 Migration refers to the process of moving from the older version (V1) of the Saitama token to the newer version (V2). This migration is essential for various reasons, including enhanced security features, better scalability, and new functionalities like staking.
How Does The SAITAMA V2 Migration Process Work?
The SAITAMA V2 migration process is automated. The team takes a snapshot of all V1 token holders and then airdrops an equal amount of V2 tokens to these addresses. You don’t have to perform any manual steps for the migration, but you will need to add the new V2 tokens to your wallet manually.
Steps To Add The SAITAMA V2 Contract Into Coinbase Wallet
To add the SAITAMA V2 contract into your Coinbase Wallet, go to the “Tokens” section and click on “Add Custom Token.” Here, you’ll need to enter the contract address for SAITAMA V2. Confirm the addition, and your new V2 tokens should now be in your Coinbase Wallet.
Steps To Add The SAITAMA V2 Contract Into Metamask
Adding the SAITAMA V2 contract into Metamask is similar to the process for Coinbase Wallet. Open Metamask, go to the “Assets” tab, and scroll down to find the “Add Token” button. Click it and then choose “Custom Token.” Enter the SAITAMA V2 contract address and confirm.
Steps To Add The SAITAMA V2 Contract Address To Trust Wallet
For Trust Wallet, open the app and tap on the “+” icon at the top right. Search for “SAITAMA V2” in the search bar. If it doesn’t appear, you’ll need to add it manually by tapping on “Add Custom Token.” Enter the contract address, name, symbol, and decimals, which are usually 18 for most ERC-20 tokens like SAITAMA. Tap “Save.”
This concludes our three-part series on SAITAMA V2 migration and adding the tokens to various wallets. We hope you find this guide helpful. Please note that all the steps mentioned are based on general practices and may vary slightly depending on updates or changes made by the respective platforms.
Safety Measures During Migration
Migration is a sensitive process, and you must take certain precautions to ensure that your tokens are safe.
Tips For Safe Migration
- Double-Check Contract Addresses: Always make sure you’re interacting with the correct contract address.
- Use Official Sources: Always use official websites and trusted sources for any downloads or information.
Additional Resources
If you’re looking for more information or facing any issues during the migration, these resources can help.
Where To Find Help?
- Official Website: Saitama Official Website
- Community Forums: Various online forums and social media platforms where the community discusses issues.
- Customer Support: Most platforms offer customer support to guide you through the migration process.
Troubleshooting Issues During Migration
If you encounter any issues during the migration, here are some steps you can take to resolve them.
Common Issues And Solutions
- Tokens Not Showing: Refresh your wallet or re-import the V2 contract address.
- Transaction Failed: Ensure you have enough ETH for gas fees.
Community Support
The Saitama community is a great resource for any questions or issues you may have.
How To Reach Out?
- Telegram Groups: Many Telegram groups are dedicated to Saitama.
- Reddit Threads: Reddit is another excellent platform for community support.
Future Updates For Saitama V2
Saitama V2 is not the end; the team has plans for future updates to make the token even better.
What To Expect?
- Staking Rewards: Future updates may include staking rewards.
- New Partnerships: The team is in talks with potential partners to expand the ecosystem.
Conclusion
Migrating from Saitama V1 to V2 on Coinbase Wallet is a straightforward process if you follow the steps carefully. Always remember to take necessary precautions to ensure the safety of your tokens. Stay tuned for Part 2 where we will cover FAQs and more.
Top FAQ’s
What Happens to My Old Saitama V1 Tokens?
Your old Saitama V1 tokens will be automatically converted to V2 tokens. You don’t have to do anything manually.
Do I Need to Pay Any Fees for the Migration?
No, the migration is free of charge. However, standard network fees may apply when you make transactions.
Is the Migration Mandatory?
No, the migration is free of charge. However, standard network fees may apply when you make transactions.
How Long Does the Migration Process Take?
The migration is instantaneous as it’s an automated process. Once the snapshot is taken, you’ll receive your V2 tokens.
Can I Still Trade My V1 Tokens?
No, once the migration starts, V1 tokens will be phased out and will not be tradable.
A multifaceted professional, Muhammad Daim seamlessly blends his expertise as an accountant at a local agency with his prowess in digital marketing. With a keen eye for financial details and a modern approach to online strategies, Daim offers invaluable financial advice rooted in years of experience. His unique combination of skills positions him at the intersection of traditional finance and the evolving digital landscape, making him a sought-after expert in both domains. Whether it’s navigating the intricacies of financial statements or crafting impactful digital marketing campaigns, Daim’s holistic approach ensures that his clients receive comprehensive solutions tailored to their needs.
Related posts:
 Are Credit Card Skins Legal? All You Need To Know
 How do I put a new credit card on my Uber account? Quick Answer
 My Chime Direct Deposit Is Late [All You Need To Know]
 Can You Transfer Cash App to Chime? Quick Answer
 Does Grubhub Accept Visa Debit Cards? Quick Answer
 Does Peacock Accept Debit Cards? Quick Answer
 Can I Rent A Car With A Chime Debit Card? [Learn The Facts]
 How To Add Venmo Card To Apple Pay Without Card? 4 Steps